Menu Profiles
Menu Profiles contain some of the setup data, the data including the menus used by the POS.
Menu Profiles also have settings for which menus become active for the POS depending on the mode the POS is active in.
Thirdly, the Menu Profiles include settings where it is possible to set different menus for different staff permission groups.
The Menu Profile is set up in:
Or
LS Retail - Point of Sale - Design - Data - Menu Profiles.
The Menu Profile works very closely with data setup in the Interface Profile. The button pad controls defined in the Interface Profile are linked to menus in the Menu Profiles.
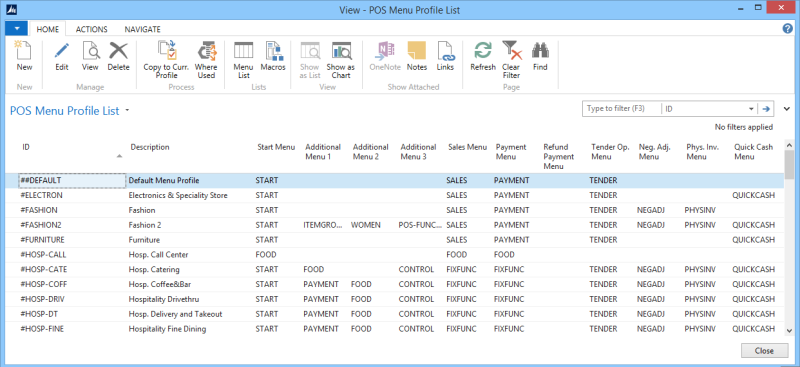
The Menu Profile List
The Menu Profile Card
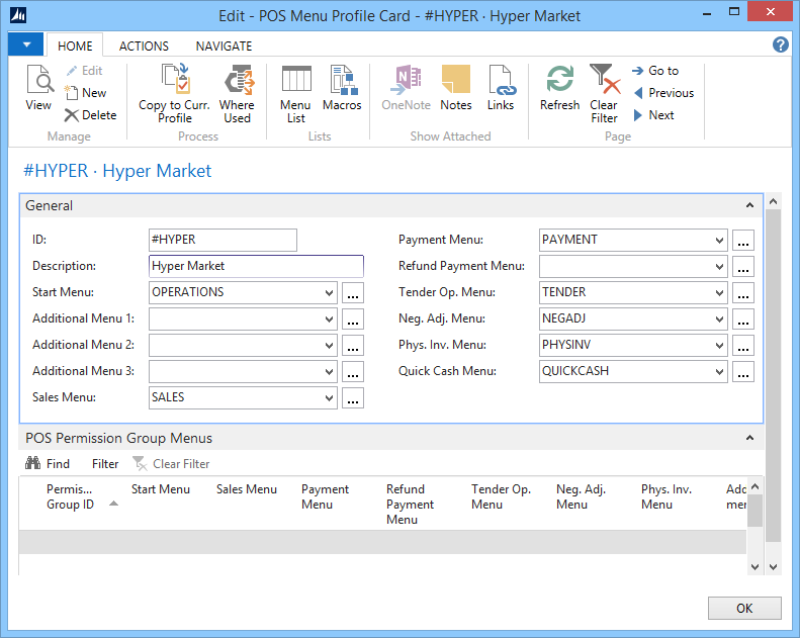
FastTab General - Default Menu Values
On the Menu Profile Card, the General FastTab, there are some fields to configure which menus are used for certain conditions; these are either for fixed POS commands or for the relevant the POS Sales Mode.
Sales Mode Menu Fields
The following fields define the active menu for the #MAIN button pad control in the POS, when the POS is in the mode the field refers to:
- Start Menu
- Sales Menu
- Payment Menu
- Refund Payment Menu
- Tender Op. Menu
- Phys. Inv. Menu
- Quick Cash Menu
Note: The #MAIN button pad control is one of the controls that is set up for the #POS panel. (See more information about panels and button pad controls in Interface Profiles).
The #MAIN Button Pad Control is always part of the #POS panel. This control is fixed data for the #POS.
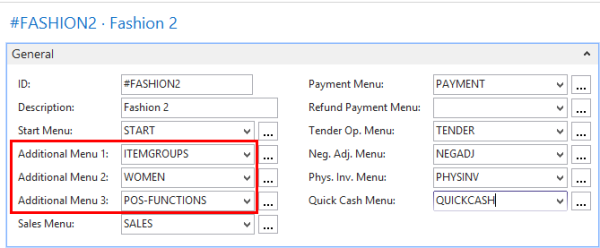
Additional Menus Fields
The additional fields: Additional Menu 1, Additional Menu 2, and Additional Menu 3 have a special functionality for the POS.
The Additional Menu fields are used to assign which menus from the menu list are the additional menus. Then on the panel #POS (part of Interface profile) the Button Pad Controls for the additional menus are set. So the menus used for these #ADDMENU controls are defined in the Menu Profile.
The Additional Menus control is set on the #POS Panel in the Interface Profile, see Interface Profiles for more details.
The system has three possible Controls for the Additional menus to the #POS Panel:
- #ADDMENU 1 – Additional Menu 1
- #ADDMENU 2 – Additional Menu 2
- #ADDMENU 3 – Additional Menu 3
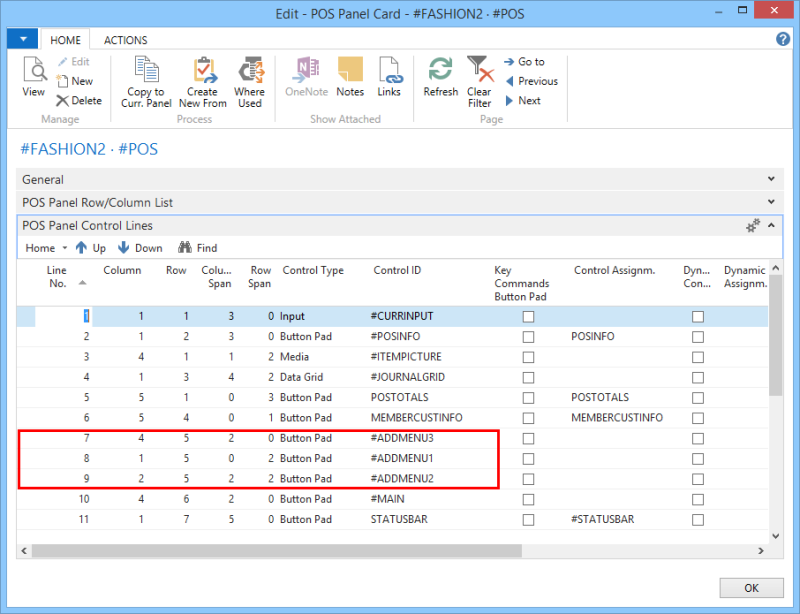
#POS Panel in Interface Profile #FASHION2:
In the POS it is possible to control which menu is opened by using specific POS commands. The system has four different POS menu commands to let the menus open as designed, that is to steer where the menus open.
| POS Command | Menu Opens in Button Pad Control |
|---|---|
| MENU | # Main |
| MENU1 | #ADDMENU1 |
| MENU2 | #ADDMENU2 |
| MENU3 | #ADDMENU3 |
POS Example: The Menu spaces on the #POS panel in #FASHION2.
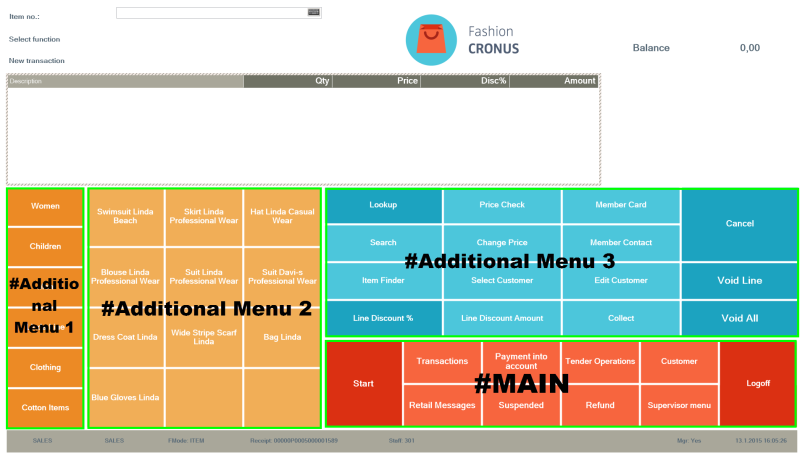
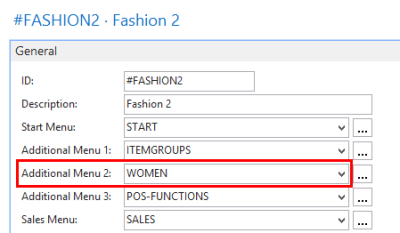
Tip: In the previous example the menu displayed for #Additional Menu 2 is always menu Women since this is the menu set in the Additional Menu 2 field in the Menu Profile.
Tip: POS Menu ITEMGROUPS is active in space #Additional Menu 2 and this menu includes these lines: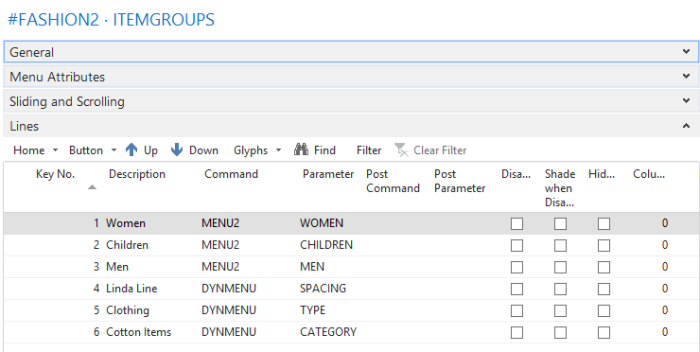
Here the menus for the first 3 lines are used with command MENU2 since these menus open in control part #Additional Menu 2.
The DYNMENU commands have parameters to direct the menu to use TYPE as MENU2.
The FastTab POS Permission Groups Menus
The configurations for the POS Permission Group menus give the flexibility to have different setups for the sales mode menus and the additional menus.

Menu List
The Menu List action displays all the menus for the selected Menu Profile.
Here, all the menus do exists that have been created for the selected Menu Profile.
Each menu includes one or many menu lines where each menu line represents one button for the POS.
See POS Menus for more information.
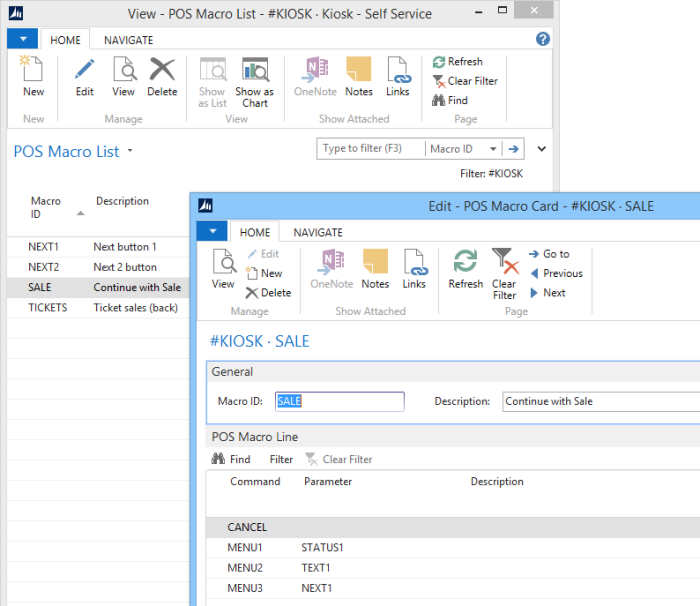
Macros
For each Menu Profile it is possible to set up Macros. Each Macro includes one or many menu lines.
Macros have the functionality to include POS commands that are executed when the macro is activated. This way it is possible to have more than two POS commands executed by one function.
Marco example: